Use your browser’s Find (Ctrl+F / ⌘F) to locate a setting. Open its row for the full explanation and limits. Source-check time is a verification timestamp, not a script publication date.
Failure Engine
8 inputsPlanner Mode
- Input type
string- Source default
"Auto"- Available options
["Auto", "Support Failure", "Resistance Failure"]- Minimum
Not specified in source- Maximum
Not specified in source- Step
Not specified in source
What it controls
Controls which failed-structure side is allowed to evaluate.
Effect on the script
Auto displays the most recent registered, confirmed support or resistance failure.
When to adjust it
Select a side only when the chart study is deliberately restricted to that scenario.
Interpretation and limits
Choosing a side does not validate that directional thesis or predict the next move.
Original input tooltip
Controls which failed-structure side is allowed to evaluate. Auto displays the most recent registered, confirmed support or resistance failure.
Pivot Confirmation
- Input type
int- Source default
4- Available options
Not specified in source- Minimum
2- Maximum
12- Step
Not specified in source
What it controls
Controls the local swing confirmation used to identify structure levels before they fail.
Effect on the script
Changes the confirmed-pivot qualification or separation requirement specified by the control.
When to adjust it
Adjust it when studying a different structural scale or the spacing allowed between compared pivots.
Interpretation and limits
Confirmed pivots require later information; a displayed historical pivot was not necessarily known at its own bar.
Original input tooltip
Controls the local swing confirmation used to identify structure levels before they fail.
Structure Lookback
- Input type
int- Source default
40- Available options
Not specified in source- Minimum
12- Maximum
180- Step
Not specified in source
What it controls
Controls the baseline window for range, body, trend, and failure persistence measurements.
Effect on the script
Changes the measurement horizon used by the oscillator, trend, range, or context component named by the setting.
When to adjust it
Change it when comparing a different analytical horizon and record the configuration alongside the observations.
Interpretation and limits
Different windows produce different contexts and are not evidence of an improved future result.
Original input tooltip
Controls the baseline window for range, body, trend, and failure persistence measurements.
Recovery Zone Width
- Input type
string- Source default
"Balanced"- Available options
["Tight", "Balanced", "Wide"]- Minimum
Not specified in source- Maximum
Not specified in source- Step
Not specified in source
What it controls
Controls how wide the recovery zone is around the failed structure level.
Effect on the script
Changes the width, depth, or allowed distance of the documented review area or qualification reference.
When to adjust it
Adjust it when deliberately comparing a narrower or broader structural review definition.
Interpretation and limits
A wider area or larger allowed distance does not make the context more reliable or guarantee containment.
Original input tooltip
Controls how wide the recovery zone is around the failed structure level.
Recovery Strictness
- Input type
string- Source default
"Balanced"- Available options
["Relaxed", "Balanced", "Strict"]- Minimum
Not specified in source- Maximum
Not specified in source- Step
Not specified in source
What it controls
Controls the frozen reclaim margin and heuristic readiness scaling.
Effect on the script
Strict requires greater displacement beyond the failed level; Recovery Holding Closes controls confirmation duration.
When to adjust it
Compare requirements under a fixed symbol, timeframe, and remaining configuration.
Interpretation and limits
A more selective or stronger heuristic score is not a calibrated success probability or a guarantee of reversal or continuation.
Original input tooltip
Controls the frozen reclaim margin and heuristic readiness scaling. Strict requires greater displacement beyond the failed level; Recovery Holding Closes controls confirmation duration.
Failure Strictness
- Input type
string- Source default
"Balanced"- Available options
["Relaxed", "Balanced", "Strict"]- Minimum
Not specified in source- Maximum
Not specified in source- Step
Not specified in source
What it controls
Controls the frozen break buffer, failure scoring and invalidation distance.
Effect on the script
Pressure is a heuristic, not a probability.
When to adjust it
Compare requirements under a fixed symbol, timeframe, and remaining configuration.
Interpretation and limits
Pressure is a heuristic, not a probability.
Original input tooltip
Controls the frozen break buffer, failure scoring and invalidation distance. Pressure is a heuristic, not a probability.
Recovery Holding Closes
- Input type
int- Source default
2- Available options
Not specified in source- Minimum
1- Maximum
5- Step
Not specified in source
What it controls
Consecutive closes beyond the frozen reclaim margin, starting after the first zone-contact candle.
Effect on the script
The contact candle never confirms recovery.
When to adjust it
Compare requirements under a fixed symbol, timeframe, and remaining configuration.
Interpretation and limits
A more selective or stronger heuristic score is not a calibrated success probability or a guarantee of reversal or continuation.
Original input tooltip
Consecutive closes beyond the frozen reclaim margin, starting after the first zone-contact candle. The contact candle never confirms recovery.
Event Tracking Horizon
- Input type
int- Source default
160- Available options
Not specified in source- Minimum
20- Maximum
720- Step
Not specified in source
What it controls
Maximum later bars per failure event.
Effect on the script
Valid recovery on the final eligible bar is evaluated before expiry. Resolved observations remain descriptive; the active chart context expires at this age.
When to adjust it
Change it when studying another explicitly defined event or observation horizon.
Interpretation and limits
A different window changes eligibility, timeouts, or completed observations. Pending and excluded cases must remain distinct from resolved results.
Original input tooltip
Maximum later bars per failure event. Valid recovery on the final eligible bar is evaluated before expiry. Resolved observations remain descriptive; the active chart context expires at this age.
Visuals
5 inputsVisual Preset
- Input type
string- Source default
"Balanced"- Available options
["Clean", "Balanced", "Rich"]- Minimum
Not specified in source- Maximum
Not specified in source- Step
Not specified in source
What it controls
Controls chart annotation density.
Effect on the script
Clean keeps only the active workflow, Balanced keeps key historical labels, and Rich allows extra state labels.
When to adjust it
Use a calmer preset when annotations obscure current structure, or a richer one when reviewing the documented historical context.
Interpretation and limits
More visible labels do not mean more independent evidence, trades, or profitable opportunities.
Original input tooltip
Controls chart annotation density. Clean keeps only the active workflow, Balanced keeps key historical labels, and Rich allows extra state labels.
Minimum Label Score
- Input type
int- Source default
75- Available options
Not specified in source- Minimum
60- Maximum
95- Step
Not specified in source
What it controls
Filters secondary historical state labels by heuristic quality.
Effect on the script
New failures and key recovery or terminal milestones remain visible.
When to adjust it
Adjust it when lower-priority annotations compete with the current chart context.
Interpretation and limits
A filtered label is not a removed historical outcome. Follow the tooltip for any milestones that bypass the filter.
Original input tooltip
Filters secondary historical state labels by heuristic quality. New failures and key recovery or terminal milestones remain visible.
Zone Projection Bars
- Input type
int- Source default
54- Available options
Not specified in source- Minimum
18- Maximum
240- Step
Not specified in source
What it controls
Controls how far the failed structure level and recovery zone are projected to the right.
Effect on the script
Controls the horizontal extent or placement of the relevant chart drawing in bars.
When to adjust it
Adjust it when the available forward chart space or the intended visual review area changes.
Interpretation and limits
Drawing farther to the right does not extend event validity or establish that price will reach a reference.
Original input tooltip
Controls how far the failed structure level and recovery zone are projected to the right.
State Label Cooldown
- Input type
int- Source default
55- Available options
Not specified in source- Minimum
50- Maximum
180- Step
Not specified in source
What it controls
Controls spacing between secondary historical labels.
Effect on the script
New failures and key recovery or terminal milestones can bypass this cooldown; retained history is bounded.
When to adjust it
Adjust only after distinguishing display-label spacing from a cooldown that changes accepted-event selection.
Interpretation and limits
A selection cooldown can change the sample. Display spacing alone must not be interpreted as better analytical performance.
Original input tooltip
Controls spacing between secondary historical labels. New failures and key recovery or terminal milestones can bypass this cooldown; retained history is bounded.
Label Font Size
- Input type
string- Source default
"Normal"- Available options
["Small", "Normal", "Large"]- Minimum
Not specified in source- Maximum
Not specified in source- Step
Not specified in source
What it controls
Controls visible chart label size.
Effect on the script
Controls the text-size mapping used by the relevant panel or chart-label renderer.
When to adjust it
Adjust it for the chart size and viewing distance while preserving readable boundaries and state information.
Interpretation and limits
A larger font can increase chart overlap. Text size does not change the analytical observations.
Original input tooltip
Controls visible chart label size.
Panel
5 inputsShow Panel
- Input type
bool- Source default
true- Available options
Not specified in source- Minimum
Not specified in source- Maximum
Not specified in source- Step
Not specified in source
What it controls
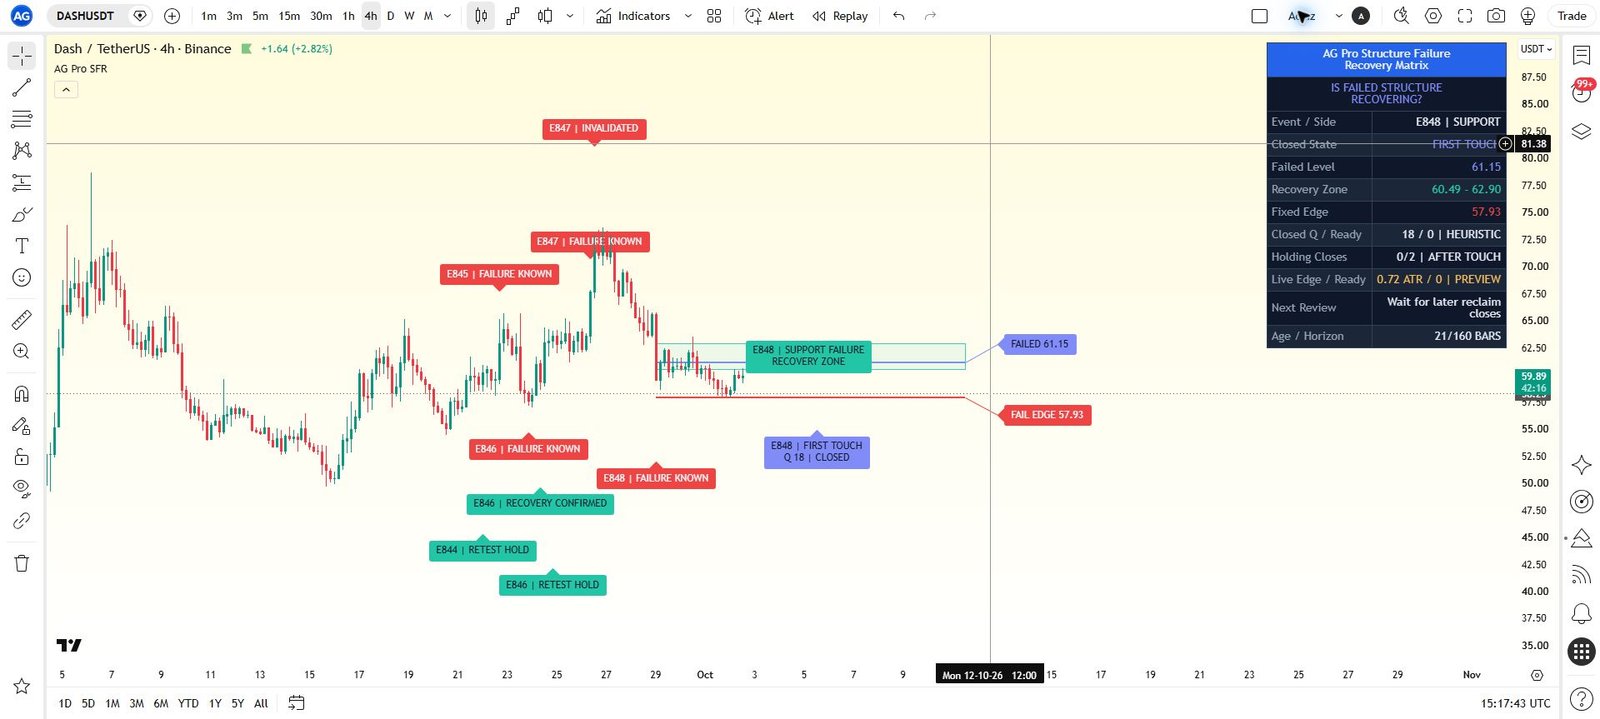
Shows or hides the AGPro workflow panel.
Effect on the script
The panel summarizes structure side, failed level, recovery zone, failure score, recovery readiness, invalidation risk, setup quality, observed recovery rate, Wilson interval lower endpoint, bars active, lifecycle state, and current review.
When to adjust it
Show the panel to inspect the state and evidence, or hide it when chart space is the immediate priority.
Interpretation and limits
Hiding the panel is a presentation choice; do not treat missing rows as missing risk.
Original input tooltip
Shows or hides the AGPro workflow panel. The panel summarizes structure side, failed level, recovery zone, failure score, recovery readiness, invalidation risk, setup quality, observed recovery rate, Wilson interval lower endpoint, bars active, lifecycle state, and current review.
Panel Location
- Input type
string- Source default
"Top Right"- Available options
["Top Right", "Top Left", "Bottom Right", "Bottom Left"]- Minimum
Not specified in source- Maximum
Not specified in source- Step
Not specified in source
What it controls
Selects where the workflow panel is placed on the chart.
Effect on the script
Selects the table position used by the panel renderer.
When to adjust it
Move the panel when it overlaps active candles, the current workflow zone, or reference labels.
Interpretation and limits
Panel placement changes presentation, not the detected context or observation accounting.
Panel Theme
- Input type
string- Source default
"Dark"- Available options
["Dark", "Light"]- Minimum
Not specified in source- Maximum
Not specified in source- Step
Not specified in source
What it controls
Selects the available panel contrast theme.
Effect on the script
Selects the panel background, border, and text color scheme used for contrast.
When to adjust it
Choose the available theme that keeps the panel readable against the chart background.
Interpretation and limits
A theme changes appearance; it does not change event qualification or statistical evidence.
Panel Font Size
- Input type
string- Source default
"Normal"- Available options
["Small", "Normal", "Large"]- Minimum
Not specified in source- Maximum
Not specified in source- Step
Not specified in source
What it controls
Changes panel text size within a compact content-sized layout.
Effect on the script
Controls the text-size mapping used by the relevant panel or chart-label renderer.
When to adjust it
Adjust it for the chart size and viewing distance while preserving readable boundaries and state information.
Interpretation and limits
A larger font can increase chart overlap. Text size does not change the analytical observations.
Original input tooltip
Changes panel text size within a compact content-sized layout.
Panel Page
- Input type
string- Source default
"Overview"- Available options
["Overview", "Statistics", "Audit"]- Minimum
Not specified in source- Maximum
Not specified in source- Step
Not specified in source
What it controls
Separate compact pages keep details accessible without widening the panel.
Effect on the script
Selects which already calculated information is presented in the visible panel or summary view.
When to adjust it
Use the current-state view for orientation and the available evidence/audit view when checking observation provenance and exclusions.
Interpretation and limits
A compact or hidden view does not remove the limitations of the underlying observations.
Original input tooltip
Separate compact pages keep details accessible without widening the panel.
Keep the settings in context
Change one analytical assumption at a time and compare the same instrument, timeframe and history. A chart reference, score, observation rate or input default does not establish a trade fill, a forward probability or a guaranteed outcome.
Return to the product overview · View this script on TradingView